1. DownloadBlackBerry Java Development Environment
2. Download Blackberry Eclipse-plugin for Java Development.
3. Download Blackberry Simulator.
4. Download Blackberry web development Tools.
5. Download Web developement simulator.
6. Download Blackberry Playbook With Adobe Air.
7. Download Blackberry Playbook Native SDK.
8. Download Blackberry Simulator.
9. Download BlackBerry Smartphone Themes studio Tools.
10.Download Blackberry Smartphone Themes studio Simulator.
Thursday, February 23, 2012
Wednesday, February 22, 2012
Set LeftField and Right Filed
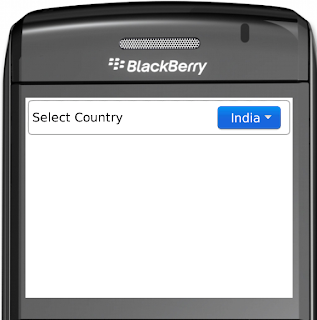
There are very common there are need to set one labelField on left side and Button or DropDownField on right side of the screen. Today i think this will help full for developed sample HoeizonalFiedlManager example that set Field Rightside and Left side.
Following code will help full.
Following code add on MainScreen where you want to add Filed.
Output will like this.
Following code will help full.
import net.rim.device.api.ui.Field;
import net.rim.device.api.ui.container.HorizontalFieldManager;

public class HFMLeftFieldRightField extends HorizontalFieldManager {

 private Field leftField;
 private Field rightField;

 private final static int TOP_MARGIN = 0;
 private final static int LEFT_MARGIN = 30;

 public HFMLeftFieldRightField() {
  super(USE_ALL_WIDTH);
 }

 public HFMLeftFieldRightField(boolean isQatari) {
  super(USE_ALL_WIDTH | Field.FIELD_LEFT);
 }

 public void sublayout(int maxWidth, int maxHeight) {

  super.sublayout(maxWidth, maxHeight);
  int width = getWidth();

  if (rightField != null) {
   int x = width - rightField.getWidth() - LEFT_MARGIN;
   int y = TOP_MARGIN;
   setPositionChild(rightField, x, y);
  }
  if (leftField != null) {
   int y = TOP_MARGIN+rightField.getHeight()/5;
   int x = LEFT_MARGIN;
   setPositionChild(leftField, 0, y);
  }

  setExtent(maxWidth, rightField.getHeight() + TOP_MARGIN * 2);
 }

 public void setLeftButton(Field leftField) {
  this.leftField = leftField;
  super.add(leftField);
 }

 public void setRightButton(Field rightField) {
  this.rightField = rightField;
  super.add(rightField);
 }


}
Following code add on MainScreen where you want to add Filed.
HFMLeftFieldRightField hfm = new HFMLeftFieldRightField();
    hfm.setLeftButton(new LabelField("Select Country"));
    ObjectChoiceField objChoField = new ObjectChoiceField();
    String[] str = {"India","Germany","Australia","Canada"};
    objChoField.setChoices(str);
    hfm.setRightButton(objChoField);

    Bitmap borderBitmap = Bitmap.getBitmapResource("img/rounded-border.png");
    hfm.setBorder(BorderFactory.createBitmapBorder(new XYEdges(12,12,12,12), borderBitmap));
    add(hfm);
Output will like this.

Friday, February 17, 2012
Create login screen in blackberry.
On Last post we have study LableFiled and CustomEditField now we go one step ahead. How to design simple login screen. Means here we are trying to design login screen also use existing component like CustomEditField we can also create same PasswordEditField also.
Please variety following Border image on resource folder before run this application.

Following Output will display.

Now you can set any background image here please change border image then display that type of image.
Enjoy..
Please variety following Border image on resource folder before run this application.

import net.rim.device.api.system.Bitmap;
import net.rim.device.api.system.Display;
import net.rim.device.api.ui.Color;
import net.rim.device.api.ui.Field;
import net.rim.device.api.ui.XYEdges;
import net.rim.device.api.ui.component.ButtonField;
import net.rim.device.api.ui.container.HorizontalFieldManager;
import net.rim.device.api.ui.container.MainScreen;
import net.rim.device.api.ui.container.VerticalFieldManager;
import net.rim.device.api.ui.decor.Background;
import net.rim.device.api.ui.decor.BackgroundFactory;
import net.rim.device.api.ui.decor.BorderFactory;

public class LoginScreen extends MainScreen {

 private Bitmap borderBitmap; // Bitmap to  that use to draw border please verify on source
 private ButtonField btnLogin, btnCancel;
 private CustomTextBox txtUserID; // Please see previous blog for this component.
 private CustomPasswordField txtPassword; // Create CustomPasswordField using CustomTextBox.

 public LoginScreen() {
  super(NO_VERTICAL_SCROLL);

  txtUserID = new CustomTextBox("User Name :");
  txtPassword = new CustomPasswordField("Password:");

  btnLogin = new ButtonField("Login");
  btnCancel = new ButtonField("Cancel");

  setLoginScreen();

 }

 private void setLoginScreen() {

  VerticalFieldManager vfmForCenterDisplay = new VerticalFieldManager(Field.FIELD_HCENTER | Field.USE_ALL_WIDTH | Field.USE_ALL_HEIGHT){
   protected void sublayout(int maxWidth, int maxHeight) {
    super.sublayout(maxWidth, maxHeight);
    int topSpace = (Display.getHeight()/4);
    setPadding(topSpace, 0, 0, 0);
   }
  };
  //Please verify this image src
  borderBitmap = Bitmap.getBitmapResource("img/rounded-border.png");
  VerticalFieldManager vfmBasicInfoWithBorder = new VerticalFieldManager(){
   protected void sublayout(int maxWidth, int maxHeight) {
    super.sublayout(maxWidth, maxHeight);
    Background background = BackgroundFactory.createSolidBackground(Color.WHITE);
    setBackground(background);
   }
  };

  vfmBasicInfoWithBorder.setPadding(0,0,5,0);

  vfmBasicInfoWithBorder.add(txtUserID);
  vfmBasicInfoWithBorder.add(txtPassword);

  HorizontalFieldManager hfm1 = new HorizontalFieldManager(Field.FIELD_HCENTER);
  hfm1.add(btnLogin);
  hfm1.add(btnCancel);

  vfmBasicInfoWithBorder.add(hfm1);
  vfmBasicInfoWithBorder.setBorder(BorderFactory.createBitmapBorder(new XYEdges(12,12,12,12), borderBitmap));

  vfmForCenterDisplay.add(vfmBasicInfoWithBorder);

  add(vfmForCenterDisplay);
 }

}
Following Output will display.

Now you can set any background image here please change border image then display that type of image.
Enjoy..
Wednesday, February 15, 2012
Custom ImageButtonField in Blackberry
Some time we need to create our custom Button using image. Here is example of that custom Blackberry ButtonField so you need to pass two image one for focusable image and another is normal image. When focus got then _on(Focusabe) image will display and when focus lost when _off(UnFocusable) image will be display let's try following code.
Now here following screen display two button. Both are same but one button focus got and another is focus lost.

import net.rim.device.api.system.Bitmap;
import net.rim.device.api.ui.Field;
import net.rim.device.api.ui.Graphics;

public class CustomeImageButton extends Field {

 private Bitmap button;
 private Bitmap on, off;
 private int fieldWidth;
 private int fieldHeight;
 private int buffer = 1;
 private static boolean focus;

 public CustomeImageButton(String _on, String _off) {
  super(Field.FOCUSABLE);
  on = Bitmap.getBitmapResource(_on);
  off = Bitmap.getBitmapResource(_off);
  button = off;
  fieldWidth = button.getWidth() + 2;
  fieldHeight = button.getHeight() + 5;
 }
 public CustomeImageButton(String _text, Bitmap _on, Bitmap _off) {
  super(Field.FOCUSABLE);
  on = _on;
  off = _off;
  button = off;
  fieldWidth = button.getWidth() + 2;
  fieldHeight = button.getHeight() + 5;
 }
 protected boolean navigationClick(int status, int time) {
  fieldChangeNotify(1);
  return true;
 }

 protected void onFocus(int direction) {
  focus = true;
  button = on;
  invalidate();
 }

 protected void onUnfocus() {
  focus = false;
  button = off;
  invalidate();
 }

 public int getPreferredWidth() {
  return fieldWidth;
 }

 public int getPreferredHeight() {
  return fieldHeight;
 }

 protected void layout(int arg0, int arg1) {
  setExtent(getPreferredWidth(), getPreferredHeight());
 }

 public static boolean isFocused() {
  return focus;
 }

  protected void drawFocus(Graphics graphics, boolean on) {

  }
 protected void paint(Graphics graphics) {
  graphics.drawBitmap(buffer, 4, fieldWidth, fieldHeight, button, 0, 0);
 }

 public boolean isFocus() {
  return focus;
 }
}
Now add this button on MainScreen
      add(new CustomeImageButton("img/play_on.png", "img/play_off.png"));
      add(new CustomeImageButton("img/play_on.png", "img/play_off.png"));
Now here following screen display two button. Both are same but one button focus got and another is focus lost.

Tuesday, February 14, 2012
Custom EditFiled in blackberry
Every java blackberry application developer require EditField in blackberry. Here as following code is use full how to create custom EditField component in blackberry.

We can also create same CustomPassword filed please change EditField to PasswordEditField.
Thank you.
import net.rim.device.api.ui.Color;
import net.rim.device.api.ui.Manager;
import net.rim.device.api.ui.Field;
import net.rim.device.api.ui.component.EditField;
import net.rim.device.api.system.Display;
import net.rim.device.api.system.Characters;
import net.rim.device.api.ui.Graphics;
import net.rim.device.api.ui.Font;

public class CustomTextBox extends Manager
{

    private final static int DEFAULT_LEFT_MARGIN = 120;
    private final static int DEFAULT_RIGHT_MARGIN = 25;
    private final static int DEFAULT_TOP_MARGIN = 5;
    private final static int DEFAULT_BOTTOM_MARGIN = 5;

    private final static int DEFAULT_LEFT_PADDING = 10;
    private final static int DEFAULT_RIGHT_PADDING = 10;
    private final static int DEFAULT_TOP_PADDING = 5;
    private final static int DEFAULT_BOTTOM_PADDING = 5;

    private int topMargin = DEFAULT_TOP_MARGIN;
    private int bottomMargin = DEFAULT_BOTTOM_MARGIN;
    private int leftMargin = DEFAULT_LEFT_MARGIN;
    private int rightMargin = DEFAULT_RIGHT_MARGIN;

    private int topPadding = DEFAULT_TOP_PADDING;
    private int bottomPadding = DEFAULT_BOTTOM_PADDING;
    private int leftPadding = DEFAULT_LEFT_PADDING;
    private int rightPadding = DEFAULT_RIGHT_PADDING;

    private int totalHorizontalEmptySpace = leftMargin + leftPadding + rightPadding + rightMargin;
    private int totalVerticalEmptySpace = topMargin + topPadding + bottomPadding + bottomMargin;

    private int minHeight = getFont().getHeight() + totalVerticalEmptySpace;
    private int width = Display.getWidth();
    private int height = minHeight;
 private int button_colour = 0xF9F9F9;
 private int text_colour = 0x666666;
 private int border_color = 0xCCCCCC;
    private String heading ="";
    private EditField editField;
    private Font headingFont;
    public CustomTextBox(String heading)
    {
        super(0);
        this.heading = heading;
        this.width = Display.getWidth()-15;
        editField = new EditField();
        add(editField);
    }
    public CustomTextBox(String heading, Font headingFont)
    {
        super(0);
        this.heading = heading;
        this.width = Display.getWidth()-15;
        editField = new EditField();
        this.headingFont = headingFont;
        add(editField);
    }
    public CustomTextBox(String heading, Font headingFont, long style)
    {
        super(0);
        this.heading = heading;
        this.width = Display.getWidth()-15;
        editField = new EditField(style);
        this.headingFont = headingFont;
        add(editField);
    }
    public CustomTextBox(String heading,  long style)
    {
        super(0);
        this.heading = heading;
        this.width = Display.getWidth()-15;
        editField = new EditField(style);
        add(editField);
    }

    protected void sublayout(int width, int height)
    {
        Field field = getField(0);
        layoutChild(field, this.width - totalHorizontalEmptySpace , this.height - totalVerticalEmptySpace);
        setPositionChild(field, leftMargin+leftPadding, topMargin+topPadding);
        setExtent(this.width, this.height);
    }

    public void setTopMargin(int topMargin)
    {
        this.topMargin = topMargin;
    }

    public void setBottomMargin(int bottomMargin)
    {
        this.bottomMargin = bottomMargin;
    }


    protected void paint(Graphics graphics)
    {

     graphics.setColor(border_color);
        graphics.drawRoundRect(leftMargin, topMargin, width - (leftMargin+rightMargin), height - (topMargin+bottomMargin), 7, 7);
        graphics.setColor(15333367);
        graphics.fillRect(leftMargin+3, topMargin+3, (width - (leftMargin+rightMargin))-5,(height- (topMargin+bottomMargin))-5);

        graphics.setColor(Color.BLACK);
        if(headingFont!=null){
         setFont(headingFont);
         graphics.drawText(heading, 2, 10);
        }else{
         graphics.drawText(heading, 2, 7);
        }

        graphics.setColor(text_colour);
        EditField ef = (EditField)getField(0);
        String entireText = ef.getText();

        String textToDraw = "";
        Font font = getFont();
        int availableWidth = width - totalHorizontalEmptySpace;
        if (font.getAdvance(entireText) <= availableWidth)
        {
            textToDraw = entireText;
        }
        else
        {
            int endIndex = entireText.length();
            for (int beginIndex = 1; beginIndex < endIndex; beginIndex++)
            {
                textToDraw = entireText.substring(beginIndex);
                if (font.getAdvance(textToDraw) <= availableWidth)
                {
                    break;
                }
            }
        }
        graphics.setColor(text_colour);
        ef.setText(textToDraw);

        super.paint(graphics);

    }

    public int getPreferredWidth()
    {
        return width;
    }

    public int getPreferredHeight()
    {
        return height;
    }

    protected boolean keyChar(char ch, int status, int time)
    {
        if (ch == Characters.ENTER)
        {
            return true;
        }
        else
        {
            return super.keyChar(ch, status, time);
        }
    }

    public String getText()
    {
        return ((EditField)getField(0)).getText();
    }

    public void setText(final String text)
    {
        ((EditField)getField(0)).setText(text);
    }

 protected void onUnfocus() {
  super.onUnfocus();
 }

 protected void onFocus(int direction) {
  // TODO Auto-generated method stub
  super.onFocus(direction);
 }

 protected void drawFocus(Graphics graphics, boolean on) {

    super.drawFocus(graphics, on);
 }
 public void setEnabled(boolean enabled) {
  // TODO Auto-generated method stub
  this.editField.setEnabled(enabled);
  super.setEnabled(enabled);
 }

}
Now add CustomTextBox on MainScreen
CustomTextBox editEmail = new CustomTextBox("Email: ");
 add(editEmail);
Output Like this.

We can also create same CustomPassword filed please change EditField to PasswordEditField.
Thank you.
Monday, February 13, 2012
Color Label Field in Blackberry
In Blackberry some time user need to display colored text instated on simple black color text. Here sample code that use full for how to create color LabelField. We can also change label Field background color as well Field Corner.
1. Change Text Color
Following output will display

2. Change Lable Field Background and text color.

3. Change Label Field Background, text color, rounded corner.

4. Color Label Field with focusable and change color on focus got and focus lost.

Thank you.
1. Change Text Color
LabelField labelField = new LabelField("Color Label Field"){
     protected void paint(Graphics graphics) {
      graphics.setColor(Color.BLUE);
      super.paint(graphics);
 }
};
Following output will display

2. Change Lable Field Background and text color.
LabelField labelField = new LabelField("Color Label Field"){
     protected void paint(Graphics graphics) {
        graphics.setColor(Color.BLUE);//Set Background color
 graphics.fillRoundRect(0, 0, getWidth(), getHeight(), 0, 0);//Fill that color on Background
 graphics.setColor(Color.RED);//set text color now here we set RED
 super.paint(graphics);
     }
};
Following output will display
3. Change Label Field Background, text color, rounded corner.
LabelField labelField = new LabelField("Color Label Field "){
       protected void paint(Graphics graphics) {
 graphics.setColor(Color.BLUE);//Set Background color
 graphics.fillRoundRect(0, 0, getWidth(), getHeight(), 7, 7);//Fill that color on Background
 graphics.setColor(Color.RED);
 super.paint(graphics);
       }

};
Following output will display
  LabelField labelField2 = new LabelField("Color Label Field",Field.FOCUSABLE){

   boolean _inFocus = false;
      public void onFocus(int direction) {
          _inFocus = true;
          this.invalidate();
      }
      public void onUnfocus() {
          _inFocus = false;
          this.invalidate();
      }
       protected void paint(Graphics graphics) {
        if(_inFocus){
         graphics.setColor(Color.BLUE);
        }else{
         graphics.setColor(Color.RED);
        }
        super.paint(graphics);
   }
       protected void drawFocus(Graphics g, boolean on) {
       }
  };
out put Like.
Thank you.
Blackberry Application Helloworld.
This tutorial is help you write a simple blackberry device hello world application. That's help you to getting start to developed blackberry application. Here i assume is that we have already install eclipse for blackberry. if you have not install blackberry eclipse please follow this step. Please follow following step.
1. Open Eclipse and create a new blackberry project.
 2. Create Project name Helloworld and press next.
 3. You will see "src" and "res" folder on this screen please press next button
 4. Select "Blackberry Application" template and press next.
 5. Specify package and class name of application in this step.
Create new package name "com.bbdevelopement.helloworld"
Write application class name. This is our blackberry application starting point.
Specify application Screen class. This is application screen we can add TextField, Button etc.
Screen Title: Title of main screen.
 After completed this step you can see that following code are display on MainApplication In the class extend it from net.rim.device.api.ui.UiApplication, this would be our main entry point for application and contain main method the source code is as follows:
You have just made your first blackberry application, you can run and test this application in simulator, it would show following screen.

1. Open Eclipse and create a new blackberry project.


Create new package name "com.bbdevelopement.helloworld"
Write application class name. This is our blackberry application starting point.
Specify application Screen class. This is application screen we can add TextField, Button etc.
Screen Title: Title of main screen.

package com.bbdevelopement.helloworld;

import net.rim.device.api.ui.UiApplication;

/**
 * This class extends the UiApplication class, providing a
 * graphical user interface.
 */
public class MainApplication extends UiApplication
{
    /**
     * Entry point for application
     * @param args Command line arguments (not used)
     */
    public static void main(String[] args)
    {
        // Create a new instance of the application and make the currently
        // running thread the application's event dispatch thread.
        MainApplication theApp = new MainApplication();
        theApp.enterEventDispatcher();
    }


    /**
     * Creates a new MainApplication object
     */
    public MainApplication()
    {
        // Push a screen onto the UI stack for rendering.
        pushScreen(new StartScreen());
    }
}
The main method is called at first by blackberry OS which makes a new instance of our application and dispatch it, in the constructor we create an instance of HelloWorldScreen and push it on the application stack.package com.bbdevelopement.helloworld;
import net.rim.device.api.ui.container.MainScreen;
/**
* A class extending the MainScreen class, which provides default standard
* behavior for BlackBerry GUI applications.
*/
public final class StartScreen extends MainScreen
{
/**
* Creates a new StartScreen object
*/
public StartScreen()
{
// Set the displayed title of the screen
setTitle("Helloworld");
}
}
You have just made your first blackberry application, you can run and test this application in simulator, it would show following screen.

Blackberry Application Developement getting start
Welcome to blackberry application development to Start blackberry application developed we need to understand blackberry development tools and software. This tutorial for beginner who want to start blackberry application development but does not know where to start. In this tutorial help to getting start Blackberry Development. In Blackberry development is broadly divided into two categories one is Blackberry Java Application Development Tools and second is Blackberry Web development tools. we see detail and tools available for that.
1. Blackberry Java Application Development Tools:
This category is used to developed native blackberry application, following tools required to developed native application.
2. Blackberry Web development Tools:
If you are a web developer and want to build native blackberry application by using HTML, CSS and JavaScript than you definitely need to check this section, RIM has provided blackberry web works plugin, which also include new blackberry simulator for testing. Download Click Here
1. Blackberry Java Application Development Tools:
This category is used to developed native blackberry application, following tools required to developed native application.
A. Blackberry JDE: It s basic and most important software you would ever need when developing blackberry application, it include a nice IDE for developing project and also few simulator available to test application. Download Click Here
B. Blackberry Plugin for Eclipse: This is an optional but quite beneficial tool, if you are a fan of eclipse and like to do development on eclipse than this plugin is for you. It do requires blackberry jde software but facilitates you with all the features for setting up that project and testing and signing and application. Download Click Here
C. Blackberry Simulator: Blackberry provided no of simulator for testing application. you can download desired emulator from RIM website. Download Click here
2. Blackberry Web development Tools:
If you are a web developer and want to build native blackberry application by using HTML, CSS and JavaScript than you definitely need to check this section, RIM has provided blackberry web works plugin, which also include new blackberry simulator for testing. Download Click Here
Subscribe to:
Posts (Atom)